

You have purchased your fence material, begun installation, and you just got to your first planned gate in your fence line. What do you do? Get strapped in, and I’ll explain every step along the way!
Step 1 Digging the Holes for Your Gate Post
The first thing you want to do when installing your gate is dig the holes for the gate post. When digging your holes you want to make them wider and deeper than a standard post hole (line, end, or corner). This is because a gate post needs to be much stronger to accommodate for frequent use and heavier load capacities. A bigger hole means more concrete to secure your post!
When sizing the width of your hole, you want plenty of room to get concrete on all sides of the post. A good rule of thumb is to keep your hole between 6-8″ wide. The bigger the post, the bigger the hole (Example: 2″ Post, 6″ Hole – 3″ Post, 8″ Hole).
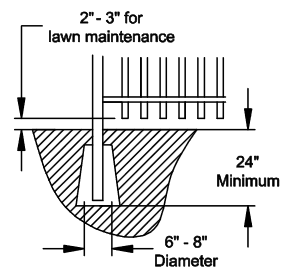
When it comes to the depth of the hole there are a few things to consider; Frost Line (If applicable), Post Length, Fence Height, & Gate Width. If you live in an area where the ground freezes like it does for us in NE Ohio, its best to dig a deeper hole, around 36″, so that you can get your concrete below the frost line. This will prevent your footers from heaving and cracking over time. If you are installing a 4’H x 4’W Gate, your post length is likely going to be a 6’L post, as that is the standard size for 4’H fencing (As noted, when living in colder climates, consider longer post to get past the frost line). A 6’L Gate post will give you 24″ of post in the ground. While 24″ is the minimum depth for nearly any fence post hole, that doesn’t mean your hole depth should only be 24″. In this situation it is best to dig your holes 27″ or deeper so that you can not only have concrete on the sides of the post, but also below and inside the bottom of the post as well. Once you decide the width and depth of the hole, start digging! When you get down to the depth you’re trying to achieve be sure to clear out the bottom of the hole so that there isn’t a bunch of loose dirt. I always recommend “belling” out the bottom of your holes too. This is when you make the bottom of your hole wider than the top of your hole. If you do this, it will make for a much stronger gate post because it will be more difficult for the gate to heave and ultimately allow for more concrete towards the bottom of the post.
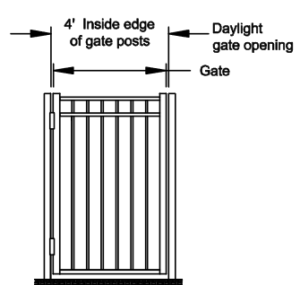
Once you’ve dug your first gate post hole, it is time to determine where your second hole will go. This is dependent solely on how wide your gate is. With our material, our gates are made for the opening. What this means is that if you have ordered a 4’W Gate, your inside measurement from post to post should be 48″, while the actual gate frame for a 48″W gate is 46.5″. This is to accommodate for gate hardware such as hinges and latches. It is always a good idea to check the allowances of your gate hardware to determine how far your post need to be apart. Our gates are always made for their opening with hardware in mind, unless otherwise stated. Measuring from the center of your first hole, make a mark roughly 3-5″ over your gate width total, and start digging the same size hole as your first. The additional 3-5″ past the gate width is so that your gate post can be centered in their holes and the concrete can be evenly distributed around it.
Step 2 Concreting Your Gate Post
You have dug your holes and tossed the post inside them. If you are in a position where you need concrete under the post to get your fence height where it needs to be, then do so before you put your post in the hole. This will also allow for concrete to get inside the bottom of the post and make the bond stronger. Once they are there, you will need your tape measure. Remember, the gates are made for their opening. In this scenario we will be installing a 48″W gate, so the inside to inside measurement of your post, or daylight measurement, will be 48″.
Once you’ve achieved the distance between the post you need and they are bubble level, slowly shovel your concrete in a little at a time so that you don’t knock your post out of its correct position. Fill your hole with concrete until you have roughly 4″-6″ of depth left to fill. At this point finish filling the hole with dirt. Pack it nice and tight around the post so it becomes sturdy. Double check your post and make sure they are level, and then verify that your measurement is where you need it. Remember in the scenario we want our two post to be 48″ apart because we are installing a 48″W Gate with a frame of 46.5″.
NOTE: You should always allow your concreted post to set up and dry before hanging the gate frame on them.
Step 3 Hanging Your Gate & Installing Hardware
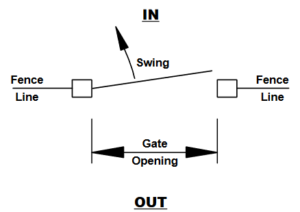
The first decision you’ll need to make when going to hang your gate will be the direction of the swing. If the fence you are installing is enclosing a pool, then you must have the gate swing out and away from the pool. This is a safety requirement most local codes follow. Whichever direction you decide your gate to swing will determine the side of the fence line that your hardware will be on. If your gate is swinging outward, the hardware needs to be installed on the outside face of the fence line. And if your gate is swinging inward, vice versa. Look to the instruction manual of the hardware for installation instruction specific to your model. You’ll first install your hinges on your gate frame. In my experience, I like to measure from both the top and bottom of the gate an even distance, and that is where I choose to install my hinge hardware. For example, I’ll measure 6″ down from the top of the gate frame, install my hinge, and then measure 6″ up from the bottom of my gate frame, install my second hinge. This allows for an even weight distribution from top to bottom and an all around more symmetrical look. Once you have installed your hinges to your gate frame, it is time to anchor them down to the dried gate post. You’ll want two people for this portion of the installation. While one person picks up the gate frame and holds it to the post, the other will anchor down fasteners. Be sure to align your horizontal rails on the gate frame with the horizontal rails of the installed fencing, if applicable. If you do not have fencing installed, and you are installing a stand-alone gate, align the 2″ gate frame to the top of the gate post. Once they are aligned, anchor down your hinges to the post.

Installing your latch is easy! Many latches are different in their design. I will be going over how to install the standard gravity latch that is sent out with our orders. If you’ve chosen a different latching mechanism, please refer to the installation manual for instructions. With the gravity latch there is two parts; the striker and the latch. Be sure to install the latch high enough on the post so small children cannot open the gate. If installing around a pool, be sure to check local pool codes and install an approved latch (Ask about our MagnaLatch). First, hold the latch up to the gate post, and mark your holes. Drill your pilot holes and then anchor your latch down with provided fasteners. Hold the striker onto the gate frame so that it is even with the latch. Drill your pilot holes and anchor the striker down. Be sure to double check all your fasteners so that every hole is anchored down tightly.
Adjusting your hinges is the last step! Refer to your manual for specific instructions. Adjust the tension on your hinges so that the gate closes by itself once its opened. Be sure not to increase the self-closing tension so much that the gate slams closed. This is not good for the post or hardware over a long period of time. Once you’ve achieved the desired amount of tension in your self-closing hinge, you’re all done! You’ve just installed your first aluminum gate!
If you continue to run into any issues, please don’t hesitate to reach out to
one of our fence professionals. We’re here to help!
1(833)442-3655
")